Welcome to Your Ultimate Home Brow Tint Guide
Tinting your brows at home can feel like a tightrope act. One wrong move and you’re left with streaky colour or unwanted staining. This home brow tint guide brings salon-quality steps right to your bathroom mirror, minus the stress. We walk you through mapping, mixing and perfect removal so you nail the look every time.
We combine years of spa expertise with a clear, step-by-step approach. No bulky theory, no jargon. Just practical tips from the Rejuvenate Spa team in Chevy Chase. Ready to start? Rejuvenate Spa Services: Your home brow tint guide for a salon experience in Chevy Chase MD shows you how.
Why Tint Your Brows at Home? Top Benefits
Doing a brow tint at home isn’t just about saving money. It’s about control, convenience and confidence.
- You call the shots: Choose the exact shade and depth you love.
- Quick results: Busy morning? A 10-minute tint can boost your look instantly.
- Custom shade: Mix a tint that complements your hair and skin tone.
- Privacy: No awkward conversations, no salon appointment needed.
These perks make our home brow tint guide a go-to for anyone who craves polished brows without stepping out the door.
What You’ll Need: Tools and Products
Before you dive in, gather your kit. Having everything at arm’s length keeps the process smooth.
- Brow tint kit (cream or gel-based).
- Tint brush or angled brush.
- Spoolie brush for blending.
- Petroleum jelly or barrier cream.
- Cotton buds and cotton pads.
- Gloves and a mixing bowl or palette.
- Timer or stopwatch.
For best results, use professional-grade products. We recommend checking out our curated range of advanced formulas. Discover our anti-age skin products helps you not only tint but also nourish hair and skin afterwards.
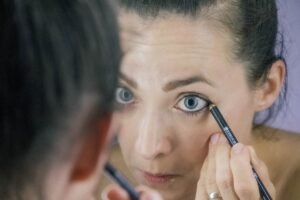
Step-by-Step: Mastering the Tint Application
Follow these stages precisely. Each step builds on the last, bringing you one tip closer to perfect brows.
-
Prep the area
Clean brows thoroughly, removing oils and remnants of makeup. Use a gentle cleanser and wipe dry. -
Map your brows
Use a white pencil to outline your ideal shape. Align the start at your nostril’s inner edge, the arch at your iris and the tail at the nostril-to-outer-eye line. -
Protect your skin
Apply petroleum jelly around brows. This barrier stops unwanted staining on the skin. -
Mix your tint
In a clean bowl, blend tint and developer in equal parts. The creamy consistency should neither drip nor be too stiff. -
Apply the colour
– Start at the tail, deposit colour and slowly work towards the front for a faded effect.
– Use a spoolie for front-fading.
– Keep lines crisp at the arch and tail with a precise brush stroke. -
Timing is vital
Most tints process in 5–10 minutes. Check progress every minute. For lighter results, remove at 5 minutes; for bold colour, wait the full 10. -
Remove the tint
Swipe off gently with a damp cotton pad. No harsh scrubbing. Pature until the area is clean.
This clear process beats memorising lengthy videos or managing unpredictable online tutorials. If you hit a snag, you can always explore a professional touch. Discover our med spa service for expert guidance and corrective shaping.
Troubleshooting Common Tinting Mishaps
Even seasoned pros tweak their approach now and then. Here’s how to fix the usual suspects:
- Uneven colour: Next time, map more carefully and brush in even strokes.
- Over-processing: Set your timer and check early.
- Skin staining: Strengthen your barrier with extra jelly and remove stain with micellar water.
- Irritation: Always do a patch test 24 hours before; skip tint if redness appears.
Nail these fixes and you’ll barely need to consult this home brow tint guide again.
Aftercare for Long-Lasting Results
Your tint deserves a proper aftercare routine. It extends longevity and keeps hair healthy.
- Avoid water and steam for 24 hours.
- Skip oil-based cleansers around the brow area.
- Brush gently with a spoolie each morning.
- Moisturise brows with a brow-safe serum every few days.
Aftercare’s pivotal. If you prefer hands-free pampering, consider pairing your routine with a facial. Book your massage treatment to relax and hydrate skin around your tinted brows.
Beyond DIY: Why Rejuvenate Spa Outshines Virtual Masterclasses
You might’ve seen courses like the Melanie Marris Virtual Brow Masterclass. It boasts high-quality videos, subtitles and celebrity clients. But let’s be real:
- No live feedback: You’re on your own if you slip.
- No product samples: You invest then hunt for kits yourself.
- One-size-fits-all: Little room for your unique brow shape or skin type.
By contrast, our Rejuvenate Spa experts offer personalised support. You follow this home brow tint guide and if you need a tweak, our digital booking system has you covered. You can book consultations or try our tailored brow shaping packages.
Plus, gifting someone perfect brows is a breeze. Give a gift card for perfect brows and let them pick a tint session they’ll love.
Final Tips and Tricks for Salon-Style Brows
- Customise shade: Mix two tint colours to nail your unique tone.
- Cool down: Rinse with cool water to seal the hair cuticle and lock in colour.
- Keep notes: Record processing times and shade mixes in a diary for next time.
Follow these finishing flourishes and your brows will look as if a pro sculpted them.
Ready to Elevate Your Brow Game?
Whether you’re a complete beginner or a tint veteran, this home brow tint guide puts you in the driver’s seat. Practise the steps, tweak your timing and colour, and before long you’ll swipe on tint like a seasoned artist. For any extra help or a salon-perfect finish, remember we’re just a click away. Get your home brow tint guide at Rejuvenate Spa Services now